
Did you know MicroSale utilizes standard pictures for the table layout?
This means you can create your own background and then upload it into the MicroSale system
Introduction
Use the photo editing software of your choice – such as Microsoft Paint or Photoshop. For the purposes of this How-To, please use Paint. Keep in Mind, your system runs in the resolution 1024x768 (pixels). This is important to know when you’re creating the size of your picture.
768 px high x 1024 px wide
Part 1: Setting up your Canvas
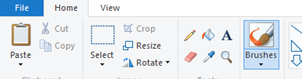
- Launch the Paint program
- Select Resize
- Select Pixels
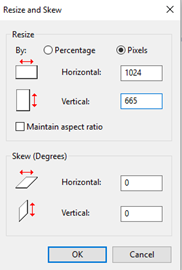
- Uncheck Maintain aspect ratio
- Type in 1024 in the Horizontal box
- Type in 665 in the Vertical box (although the system is using the height of 768, there is a toolbar on the table layout – 665 takes into consideration of the toolbar)
- Select OK
Part 2: The Basics
Add in walls – the easiest way to start is with the Rectangle image and dragging it to the size of the canvas
- Use the Line image to add in walls and landmarks within the Rectangle
- Use Undo or the Eraser image if you made a mistake
- Use the Paint Bucket image to fill in closed lines
- Use text to show what the landmarks are (such as “kitchen”, “waiting area”, “entrance”
- Repeat steps until you have the desired effect
- No tables are added in paint!! You will only create the floor layout in Paint. You will need to use the tables in MicroSale in order for your servers to select tables for order entry
- Select File > Save As > FLR-yourname >Save as type: .bmp (or 24-bit Bitmap). You must use the prefix FLR-. This prefix is how MicroSale knows what to do with the picture.
- For Version 8- Save the FLR-yourname.bmp in Local Disk (C:) > Program Files > Micro$ale
- For Version 9- Save the FLR-yourname.bmp in Local Disk (C:) > Program Files > Micro$ale > Picture Files
Part 3: Enabling the Table Layout in MicroSale
If the table layout feature is already activated in your system, please skip Part 3 and resume at Part 4.
- Find the Full Service Register Options by going to: Managers Menu > Register Setup > Register Options by Terminal > Full Service
- Tick the checkbox next to Enable Dining Room Screens
- Decide whether you would like to Bussers to release tables and/or allow host to open tables
- Ticking the checkbox next to “Bussers Release Tables” turns the table bright green after the check has been paid to represent that the table is dirty. After the busser cleans the table, he or she can release the table back to the floor
- Ticking the checkbox next to “Allow Host to Open Tables” enables the host or hostess to seat the party on the table layout – this helps the server see that a table has been sat in his or her section
- After reviewing the three table layout options, select Save and Exit
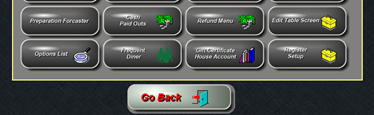
- Go back to the ID Screen and then click on Manager’s Menu – The Edit Table Screen should now be enabled
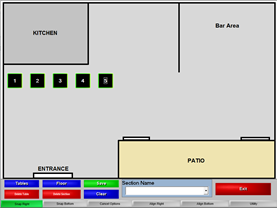
Part 4 A: Building the Layout in MicroSale
- Select Floor
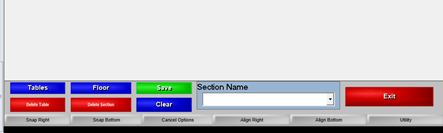
- Find your FLR-yourname, highlight it and click anywhere in the background (Your layout should now appear on the screen)
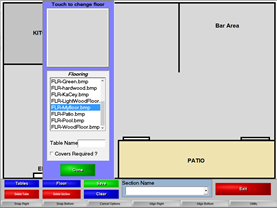
- Select Done
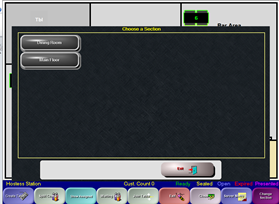
- Type in a Section Name (your servers will see this name, so make sure you name it something understandable such as “Main Dining Room”, “Bar Area”, “Patio Bar”, etc.)
- Select Tables
- Scroll through the tables to find the tables you want to use
- When a table is shown in the preview box that you like, type in a table number (click Covers Required if you want a prompt for “Number in Party” when the server starts a table)
- Click on the table in the preview box and it will populate on the screen
- Left click (hold mouse click) and drag it to where you want it
- As you continue to work on your layout, make sure you Save periodically (just to make sure your work gets saved)
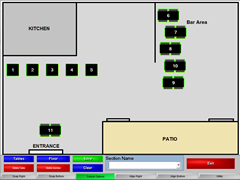
Part 4 B: Snapping Tables
Similar to the button layout screen, you can “snap” buttons to the right or bottom of other tables. Use one table as your axis point (as the starting point). The snap buttons will space tables at 50% of the table width.
- Now that you have added tables to the screen, it may look messy and unaligned
-
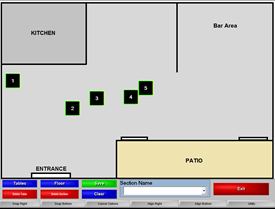
- Click on Snap Right
- Click on the “anchor” table – In the above picture, tables 2-5 should go to the right of table 1
- After clicking on the first table, click on all other tables that need to go to the right of the first table
- Click Cancel Options when you are done snapping the buttons
Part 4 C: Aligning Tables
Use one table as your axis point (as the starting point). The Align buttons will align all other tables to the right or bottom of your starting point table.
- To align all buttons to the bottom of your starting point table, click on the Align Bottom button
- Click on the starting point table first (in this example, it is Table 6)
- Now click on each table that needs to align under your stating table
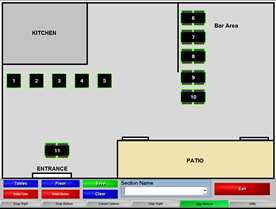
- Click on Cancel Options when you are finished
- Click Save when you are finished
Part 4: Viewing the Active Layout
- To view the active table layout, click on Show Seating on the ID screen
- The active floor plan shows table numbers in green representing the tables are ready to be sat
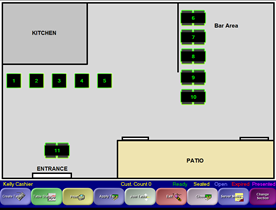
- Congratulations, you are now ready to seat parties on the table layout!
Part 5: Assigning the Table Layout
If your restaurant has multiple floor plans, the server will be prompted to pick their section when they clock in or start an audit. A server still has the ability to pick up a table in another area by toggling to another section by selecting Change Section. If a server selects “All Areas” instead of one specific section, the server will go directly to the Server Menu when logging in.
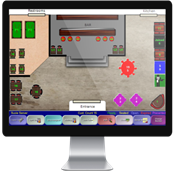
Part 6 A: Understanding the Table Layout Color Codes
The Table Layout uses color codes to represent the stages of a sitting party.
Green= The table numbers appear green when the table is active and “Ready” to be sat
Blue= The table is “Open” (meaning it has an open check). Underneath the table name or number, it displays the total number of minutes the check has been open (in the below example the check has been open for 1 minute).
Yellow= The table has been “Seated” by the host or hostess but does not have a check started (the host(ess) simply “sat” the table by putting in a total number in the party and assigning it to the table.
Red= The table is “Expired” or has been sitting for a prolonged period of time. This time is defined in register options ( Manager Menu > Register Setup > Register Options by Terminal > Time Clock / Misc.)
Purple= The table has been “Presented” with the check but has not cashed out
Part 6 B: Understanding the Table Layout Toolbar
![]()
The toolbar on the bottom of the table layout offers helpful shortcuts to perform common server tasks.
- Create Table – Allows servers to start a table that is not shown on the table layout
- Table Status – Server can select Table Status and then a table to see when each item was entered on the check
- Print – Allows Server to select Print and then a table to quickly print the check
- Apply Tip – Allows Server to enter a tip
- Join Table – Allows Server to combine two tables together (to help food runners when two tables are on one check)
- Close – Allows Server to select Close and then a table to go directly to the payment screen to close a check
- Server Menu – Takes the Server to the regular Server Screen
- Change Section – Allows Servers to toggle through multiple floor plans