
Register Options are configured per terminal. This allows the restaurant to use different functionality based on individual terminal (or register). Please set the following register options for each terminal that should be able to accept phone orders.
Configuring Register Options for Phone Orders
- Managers Menu > Register Setup > Terminal Configuration > Register Options > Phone Orders (on top toolbar)
To accept phone orders, tick the option Enable Phone Orders and save. If you do not need additional settings or special functionality, you can go ahead and Save and Exit.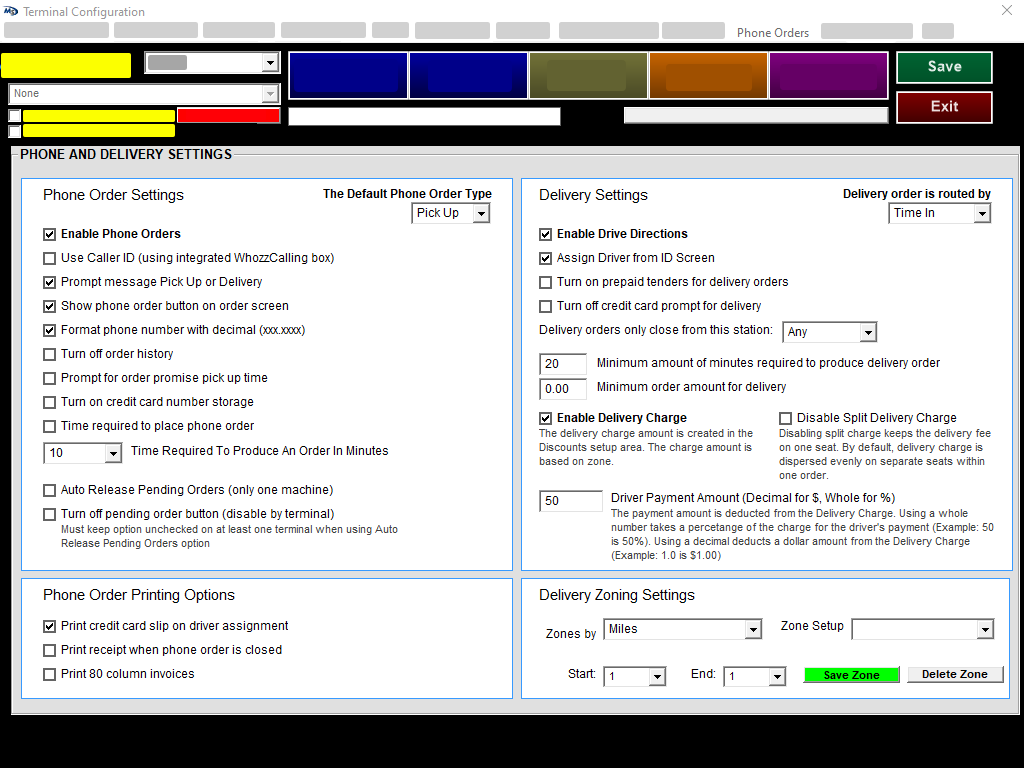
Additional Available Options
|
Phone Order Settings |
|
|
Term |
Description |
|
Enable Phone Orders |
Activates the “Phone Order” button on this terminal only. Set this option on all terminals that need the ability to accept/enter phone orders |
|
Use Caller ID |
This option enables the Caller ID function but you must have a compatible Caller ID box attached to one of the terminals. |
|
Prompt message Pick Up or Delivery |
This option forces the server/cashier to select whether the call in order is pick up or delivery before the order can be placed. |
|
Show phone order button on order screen |
This option will automatically place the “Phone Order” button onto the top of the Order Screen, within the grey section that also includes the “Pay Order” button. Note: This is only available for Quick Service or Quick Bar environments |
|
Format phone number with decimal |
Reformat phone numbers entered with a period between number sets. Example: 5551111 will format to 555.1111 automatically within the system (keeps consistency on entered phone numbers) |
|
Turn off order history |
If this option is checked then the POS no longer will store the last order of a phone customer. This will also disable the "Reorder" function for the phone order customer. |
|
Prompt for order promise pick up time |
When this option is enabled then when a phone order is placed it will prompt the cashier to enter in the number of minutes that the order is expected to be completed by so that an accurate quote time can be given to the customer. |
|
Time required to place phone order |
When this is enabled a specific "Pickup @" time has to be selected on the customer information screen before the phone order can be completed. |
|
Time Required to produce an order in minutes |
This option sets the minimum production time for call in orders. If entering an order for a future time/date then the order will print to the remote printers "X" minutes prior to the pick up time (X= time Required to Produce Order). |
|
Auto Release Pending Orders (only one machine) |
If this option is set then call ahead phone orders will be automatically sent to the remotes 20 minutes (or whatever time is set) prior to the scheduled pick up/delivery time. |
|
Turn off pending order button (disable by terminal) |
When a call ahead phone order is placed a notification will appear on the screen when the order is ready to be released to the remote printer. This option will disable the notification on the local register. |
|
Phone Order Printing Options |
|
|
Term |
Description |
|
Print credit card slip on driver assignment |
When this option is enabled the credit card slip for a delivery call in order will print once the order is assigned to a driver.
|
|
Print receipt when phone order is closed |
By default, when a phone order is placed the customer receipt prints immediately after the "done" button is touched. When this option is enabled the receipt does not print until the order is closed. |
|
Print 80 column invoices |
This allows phone order receipts to be printed on a connected report printer instead of the standard POS receipt printer. |
|
Delivery Settings |
|
|
Term |
Description |
|
Enable Drive Directions |
When this is selected the integrated use of Google Maps will populate drive directions automatically *integration to Google Maps is available with an annual subscription |
|
Assign Driver from ID Screen |
When this option is checked an "Assign Driver" button is available on MicroSale's ID screen. This button allows you to assign a driver to any available phone orders without having to do this from the "Edit/Close Order" screen. |
|
Turn off credit card prompt for delivery |
This prevents the POS from prompting for credit card payment when a delivery phone order is placed. Credit card payment can still be applied through the edit phone order screen. |
|
Delivery orders only close from this station |
This forces the user to only close delivery orders from a designated terminal |
|
Minimum amount of minutes required to produce delivery order |
This option sets the minimum production time for delivery orders. If entering an order for a future time/date then the order will print to the remote printers "X" minutes prior to delivery time (X= time Required to Produce Order).
|
|
Minimum order amount for delivery |
This field sets the minimum amount a sale must be in order to be eligible for delivery. |
|
Enable Delivery Charge |
By checking this box an automatic delivery charge will be applied to any orders specified as "delivery". For setup, refer to the section, “Creating a delivery fee (Part 1)” |
|
Disable Split Delivery Charge |
By default, a delivery fee (or delivery charge) is dispersed evenly on all separate seats. Ticking this option keeps the delivery fee on one seat. |
|
Driver Payment Amount |
This option sets the amount a delivery driver gets paid by the restaurant for each delivery that he/she makes. This is deducted from the "delivery fee or delivery charge" a restaurant adds to a check when an order is placed for delivery. This is not a tip. |
|
Delivery Zoning Settings |
|
|
Term |
Description |
|
Zoned by |
Zones are setup by miles or minutes from the restaurant’s location. This setting uses the Google Maps integration. |
|
Zone Setup |
The Zone Setup assigns a Zone Name (created in “Creating a delivery zone (Part 2)”) to Miles or Minutes from the restaurant’s location. |
|
Start / End |
Select the dropdown next to Start and End Choose the appropriate starting number and ending number. For your first zone, start at 0. You may have customers less than 1 mile (or 1 minute) from your location. |