
The Quest tablet has a built-in MiniSmart EMV reader (integrated through Datacap NETePay)
Installation of Datacap NETePay
- Install Datacap SQL instance
- Install Datacap DSI EMV Client (or PDCX Client if using the out of scope non emv solution). Use the most up-to-date DSI Client installation pac It can be downloaded from the MicroSale FTP site or from the Datacap website at the following link: http://www.datacapepay.com/downloadmenu/
- Install Vendor specific EPay version with EMV suppor (i.e. FDMS Rapid Connect Host 5.06.10 )
- These steps only need to be followed on the computer that will be hosting the EPay software
Installation and Configuration of IDTek MiniSmart II and Augusta:

The unit is installed as an HID compliant device and does not require any additional setup in Windows. This is also the integrated EMV chip reader solution utilized by the Quest Tablet. In the pinpad assignment and configuration in MicroSale you will select the “ID Tech MiniSmart II” or “Augusta” attached device, assign it to Comm Port “1”, and select the name of the register from the “Equipment Name or Register Name” field.
If you attempt to test connection and the connection fails the common solution for this with this particular device is that it is not set in HID mode. To fix this you can run the “IDTech SecureMag USB Demo.exe”> General Settings > then selected “USB HID Mode” at the bottom of the list.
MicroSale EMV Configuration
Confirm that the following files are available in C:\Program Files (x86)\Micro$ale:
- “dsiEMVX.ocx” is located in the MicroSale directory and are registered.
- “LevelUp.dll” and “LevelUp.tlb” are located in the MicroSale directory and are registered.
- “GeneralLib.dll” and “GeneralLib.tlb” are located in the MicroSale directory and are registered.
- “EMVProcessLib.dll” and “EMVProcessLib.tlb” are located in the MicroSale directory and are registered.
- Start MicroSale and go to Managers Menu > Register Setup > Terminal Configuration > Credit Card Setup
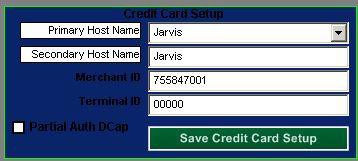
- Use the “Dial EPay Setup” button to lay the default settings for EPay
- Click on the “Primary Host Name” button to display a list of available registers on the network and select the machine hosting the EPay softwar This should populate the “Primary Host Name” as well as the “Secondary Host Name”
- Depending on the Processor you may also need to provide the Merchant Id and the Terminal Id numbers.
- When finished touch the “Save Credit Card Setup” button to save these changes
- Next, click on the “Data Cap EMV” button to populate the EMV Device setup windows
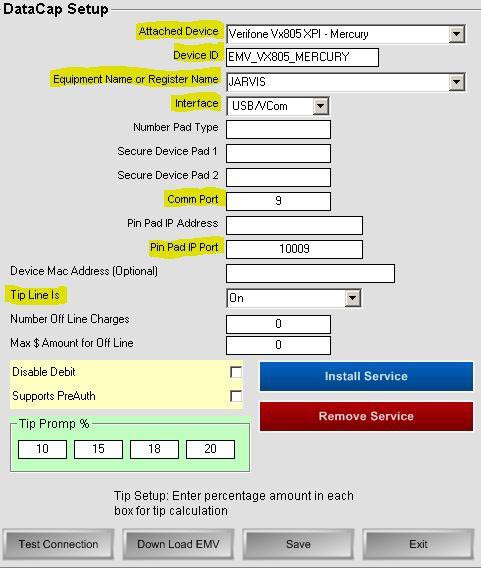
- From the “Attached Device” drop-down menu, select the EMV PinPad Model and processor you will be using. In this example we will be using the “Verifone Vx805 XPI- Mercury”.
- Select the name of the register from the “Equipment Name or Register Name” field
- Select the connection type by clicking the “Interface” drop-down menu and selecting “USB/VCom”.
- In the “Comm Port” field type in a port number to match the virtual Com created during the USB Driver Install for the EMV device you are using
- Touch “Save” to record these setting
- Verify these settings are good and the device is recognized by clicking on the “Test Connection” button. It will either say “Successful” or provide a connection error. If successful, move on to Step 12. If not, please confirm device is installed correctly and configured for USB connection.
- If your test was successful then the remaining step is to click on the “Download EMV” button from this screen. This will take approximately 60 seconds to download to the EMV reader and will post a message when completed.
- Exit all screens when completed
- Repeat steps on all registers
Creating an EMV Payment Tender
You must enable EMV on the credit card payment tender to use EMV processing.
- Go to Managers Menu > Register Setup > Terminal Configuration > Tenders-Job Codes-Paid Outs-etc.
- On an Existing Credit Card Tender:
a. Click on the dropdown under "Tender Name" and select Credit Card
b. Remove "Authorization Required" and tick the option next to EMV Pad.
c. Save - To create a New Credit Card Tender:
a. Type in Credit Card
b. Tick the option next to EMV Pad
c. Save
Batch Settlement
Most processors will still settle the batch through the POS if using EMV. This process is just like the settling of charges using our non emv processing solutions. During the end of day MicroSale will prompt to settle/clear the batch. No additional settings are required.
If batch is not emailing you can edit the following line in the Function.InI file :
[Printing Options]
EMV Batch 80 Column Only=Yes
Offline Credit Card Storage
This feature works with Datacap’s NETePay EMV solutions only. To enable the feature you will need to allow it and configure it in the NETePay software setup through the Datacap PSCS website. Along with enabling/disabling the feature you are also able to set limits on the number of transactions stored offline, purchase limit for stored transactions, and the amount of time that it will allow you to store offline transactions.

A few offline settings can also be set in the MicroSale application. You will also be able to set the maximum number of offline charges the POS will allow as well as the maximum $ amount per transaction allowed.

Misc MicroSale Settings:
Customizing the credit card slip
“Sign Line”, “Tip Line”, etc. are controlled by the EMV pinpad and processor by default. If you would like to use the receipt printing settings in MicroSale then you will need to disable the EMV print receipt. In the “Functions.ini” there is a line in the credit card section that says “EMV Receipt=”. Type the word “Off” after the “=” and save the file. This will enable the use of MicroSale’s print settings.
Disabling Debit
“”Disable Debit”- when this option is enabled it removes the “Debit” option when the credit card tender is selected. This also allows the credit card tender to go straight to the EMV pinpad without the second window popping up to select Credit/debit., saving time.
Preauthorizing Cards (Pinging a card to make sure there are funds on the card and/or holding a card on file for a tab/table)
“Supports PreAuth”- when this option is enabled it allows for PreAuth/PreAuthCapture with merchant processor. WARNING: YOU MUST MAKE SURE YOUR PROCESSOR SUPPORTS PREAUTH!! IF YOU ENABLE THIS AND YOUR PROCESSOR DOES NOT SUPPORT IT, YOU WILL LOSE THESE CHARGES!!