
By default, modifiers print to the same remote printer as the menu item to which they are attached.
However, you can send a modifier to a different printer or to not print the modifier at all. This feature is useful if you need to send a modifier to a specific prep area without the main menu item that was ordered, such as side salads, fried items, etc.
In this article:
- Printing a modifier on a specific printer
- Rerouting (re-steering) the entire menu item and all modifiers based on the selected modifier
Rerouting a modifier to a specific printer
To route a modifier to a specific printer (or to set it to not print to the remote printer) that does not follow the menu item, please follow the steps below.
Managers Menu > Menu Maintenance > Modifier Setup
- Select the drop down list under Modifier Title and choose the appropriate modifier group (or build a new group)
- Click on the modifier that should print to another printer (or not appear on the ticket at all)
- Select Printer Routing
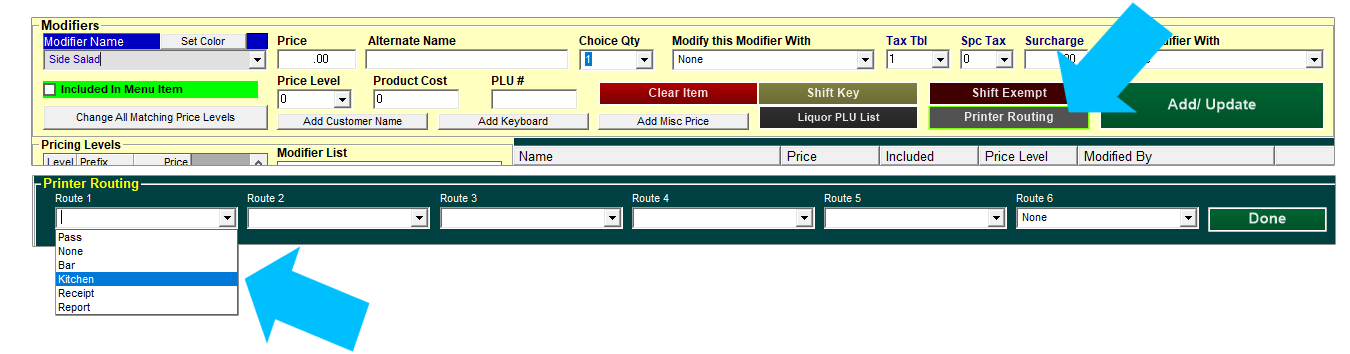
- In Route 1, choose the desired printer or select "Pass" to disable the modifier from printing to the remotes all together. Please refer to terms on the bottom of this article.
- Select Done
- Select Add/Update (don't forget this step! without this, your item does not go back into the modifier list)
- Select Save
- Select Exit
| Routing Terms (in dropdown menu) | |
| Pass | modifiers set to "Pass" are essentially "passed" and do not print on the kitchen/bar remote printer; these items will still print on the customer's receipt |
| None | by default, all modifiers are set to "None". This is a placeholder; modifiers set to "None" follow the menu item's print routing. |
| Printer Names (Kitchen, Bar, Expo, etc) |
these are the printer names saved in your system. Assign the Route 1 to a specific printer (you can assign it to additional printers in Route 2, Route 3, etc)., then when you are done, select Done, then Add/Update. |
Alternatively, you can route menu items by modifier.
Rerouting a menu item by modifier chosen
- Type in Route Printing (under Department/Function), and the entire menu item (attached to this modifier group) redirects based on the modifier chosen.
- Select the drop down list under Modifier Title and choose the appropriate modifier group (or build a new group)
- Next to Department/Function, select Route Printing from the dropdown or type it in.
- Click on the modifier that should reroute the menu item (when the modifier is selected, you should see the name under "Modifier Name" on the left side of the screen in the yellow box.
- Select the Printer Routing button
- In Route 1, choose the desired printer or select "Pass" to disable the modifier/menu item from printing to the remotes all together. Modifiers assigned to "None" will continue to follow the main menu item's printer assignments.
- Select Done after the printer(s) is chosen.
- Select Add/Update (don't forget this step! without this, your item does not go back into the modifier list)
- Select Save
- Select Exit