Setting up Custom Screensaver with Logo
- Go to Settings > Personalization > Lock screen, and select Screen saver settings. In the Screen Saver Settings window, choose a screen saver from the drop-down list.
- By default, Windows 10 offers six screensavers – 3D Text, Blank, Bubbles, Mystify, Photos and Ribbons.
- Select the screensaver from the drop-down menu and change its defaults Settings, if available.
- The Photos screensaver allows you to pick a custom picture or logo.
***Archived Article*** For use on Windows XP Operating Systems and Below ***
Please use above article for Windows 7 and newer.
Please load separately on each terminal.
Note:
Supported image types: .bmp or .jpeg only.
For the appearance of a transparent background, set the background of your image to black.
Supported image types: .bmp or .jpeg only.
For the appearance of a transparent background, set the background of your image to black.
- First create a company logo in .bmp
- Go to the “screen saver” folder on the FTP
- Msaledealer > $MSCD > Install Files > Install Support > Screen Saver
- Copy the Screen Saver folder and paste the folder on your local computer
- Double-click and run the setup.exe file within the folder
- Open “logo.dat” and type in the name of your logo (“ yourcompanylogo.jpg”; “yourcompanylogo.bmp”; etc.).

- Copy the “logo.dat” and your image from the “Screen Saver” folder and paste them into the C:\Windows directory
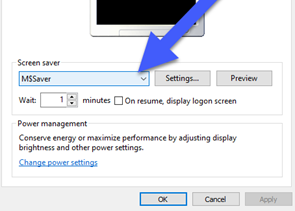
- (In Windows 10). Go to Settings > Personalization > Lock Screen, and select Screen saver settings.
- In the Screen Saver Settings window, select “M$Saver” from the Screen Saver dropdown menu