
- Installing SQL Server
- From the FTP site: MSaleDealer > $M$CD > Install Files> Interface Install Files>MicroSale SQL Server 2008 R2 Express or MicroSale SQL Server 2012 R2 Express (Select the appropriate SQL installation folder based on your computer’s operating system (64bit or 32bit) or use the following link: www.microsale.net/download/MicroSale-SQL-Express-Install.zip
- Save the MicroSale SQL Server 2008 R2 Express folder locally
- Open the folder from your computer
- Double-Click on the “MicroSale SQLExpress Installer (x86 or x64).bat” file to begin SQL installation
- When complete start MicroSale to activate SQL and Create SQL DB’s.
- Setting up SQL in MicroSale
- Start the MicroSale software
- From the Managers Menu, go to Register Setup then Terminal Configuration
- Select Find SQL Servers
- When the list of all computer names on the network appears in the box, click on the restaurant’s server PC Name or on the workstation PC Name that will be deemed as the server
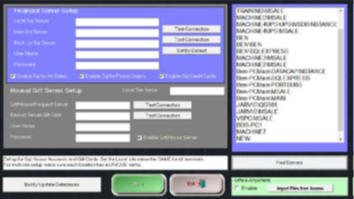
- When the PC name is highlighted, click in the Local Sql Server field (the IP address will automatically populate)
- Repeat Steps 4 & 5 to select a Back Up Server if using a backup SQL server. For instructions on setting up and configuring a Backup SQL Server refer to section III of this document.
- Highlight the same PC name again and click in the Main Sql Server field (the IP address will automatically populate)
- Select Set By Default to populate the User Name and Password
- Select the Gift/House/Frequent Diner Server (this may be the Main Sql Server or an offsite server – test the connection to ensure proper setup by selecting “Test Connection”)
- Repeat Step 9 to select a Back Up Server if using a backup SQL server. For instructions on setting up and configuring a Backup SQL Server refer to section III of this document.
- Select Save and then Yes to Update All Remotes
- Restart MicroSale to verify proper setup
- In the lower right corner of the screen, you should see “Sql” listed by the version number. If Sql does not appear, please contact technical support

Creating and Updating the SQL Databases
- Go to Managers Menuà Register Setupà Setup/Configuration.
- Select the button on the bottom left corner called “Database Update” to access the MicroSale Database Utility.
- Select “Load SQL” to display a list of all SQL DBS files.
- Select “Select All” to place a check in the box next to all of the SQL DBS files.
- Touch the “Create/Update” button to build the SQL databases.
- When the build is complete a message will display with an “Update Completed” message.
- Click “Ok” to accept.
III. Setting up Backup Server Program
Like the main SQL instance you will first want to install SQL (Same instance) on the secondary/backup server computer. Use the same steps described in section I of this document to install the secondary SQL instance.
Once the backup SQL is installed and the Backup SQL Server path is assigned in steps 6 and 10 of section II of this document you can then proceed to the MSale Backup Server Utility.
To access this utility from the Terminal Configuration page click on the Configure SQL Backup button on the menu bar at the top of the screen to display the window shown in the image to the right.
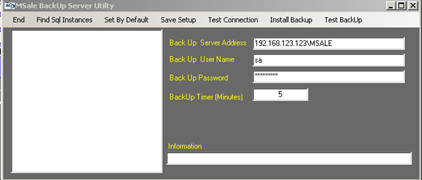
This is where you would put the name of the terminal that has been designated as the backup SQL server, as well as the SQL user id (sa) and the password (MSale1221). It is recommended to set the BackUp Time (this is the interval that the main server sends updates to the backup) to 5. After these settings have been configured, hit Test Backup. If the backup tests successfully hit the Save Setup button to save the settings.
Note: there is no longer an automatic switchover. If the main server fails, it will be necessary to get into Microsale on the slave terminals (including the backup server) and switch the primary server path to the backup server.