You can upload any bitmap, black/white image that you want to print on receipts. The logo replaced the restaurant name on the receipt.
Make sure your image is in the following format:
- BMP format
- black and white (or monochrome)
- no larger than 400 pixels wide and 300 pixels high
Save your image:
- Create a logo in your preferred photo editing software such as Paint, Photoshop, etc.
- Size the logo no wider than 400px and no higher than 300px.
- With thermal printers, the image will print in black and white only. For best quality, save your image as monochrome - black and white only, no grayscale!).
- Must be saved in BMP format
- Save the logo in C:/Program Files/Micro$ale/Picture Files
To add a logo to your receipts, you must use Generic Text Printer Drivers (Printers and Devices > Right click on the appropriate printer > Click on Printer Properties > Advanced > Choose Generic Text Driver > Apply Changes > Exit).
Setting up your image in MicroSale:
- Launch MicroSale and go to Managers Menu > Register Setup > Terminal Configuration > Printer Setup. The logo setup is located on the bottom of the screen.
- Before attempting to load the image file please make sure your logo follows the proper specs (see above section, "Save your Image".)
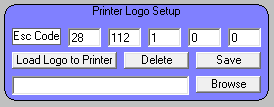
(The screen capture above shows the default codes to use when loading a logo)
- Enter the Esc Codes: 28, 112, 1*,0**,0
- (* this is the number of the logo you want to print)
- Each printer can store multiple images (** this is the desired size of the logo)
- 0 - default size
- 1 - double wide
- 2 - double high
- 3 - double wide and double high
- Use the “Browse” button to locate the bitmap file you wish to load onto the printer. Once selected click on the “Load Logo to Printer” button to upload the bitmap image. Once completed touch the “Save” button to apply changes. You'll be prompted, "Please wait while resetting printer"... The printer will reset itself.
- The receipt printer codes will also need to be adjusted to accommodate the logo setup.
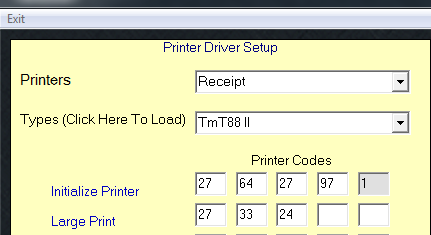
- Go back to the “Printer escape Codes” section and select the receipt printer from the drop-down menu next to “Printers”. The first line of codes for the printer is the “Initialize Printer” line. By default, it is 27, 64.
- To make it work with the logo, the line needs to read as follows: 27, 64, 27, 97, 1 as shown in the image below. Use the “Save to Printer” button to apply the changes.