
The area of the Access Phone Orders screen will allow you to get turn-by-turn navigation from the previous customer’s house as well as print extra receipt copies, assign a driver, and quickly close open orders.
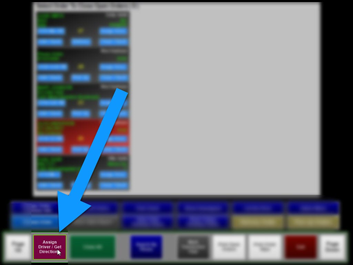
Locating the Assign Driver / Get Directions button
Locating the Get Directions feature can be done in two different ways.
- Option 1: Enable the Register Option “Assign Driver from ID Screen”. This will place the “Driver Access” option onto the ID Screen. Once you select the “Driver Access” button and enter your ID #, you will have the option to choose “Assign Driver Otherwise, you can get to this area by going to Access Phone orders and selecting Assign Driver/Get Directions button.
- Option 2: Go to the Ordering Screen or Server Screen and select either Phone Order or Access Phone order and then select the “Assign Driver/Get Directions” button.
How to dispatch a driver (assign driver)
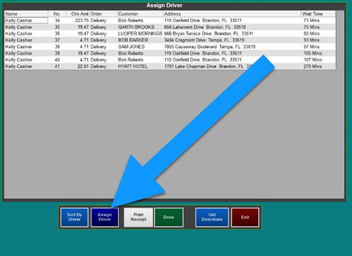
- You can assign a driver for dispatch from multiple places; through the Driver Access button on the ID screen or selecting Phone Order > Close or Edit Phone Order
- Select Assign Driver / Get Directions
- The screen displays all unassigned orders in a spreadsheet.
- Touch Assign Driver
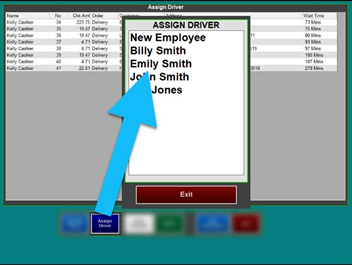
- Select the Driver’s Name
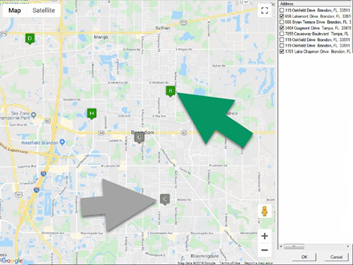
- After selecting the driver’s name, the map displays all the open delivery orders
- Select a gray pin or place a check mark next to the address. The pin will turn green, meaning is assigned to that driver.
- When finished, select OK
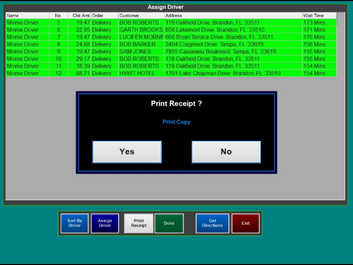
- Once the addresses are selected, choose whether or not to print the customer receipts
-
Keep the credit card slip with the customer receipt to stay organized. Ask the customer to sign the slip and add a tip at the time of delivery, if the tip was not already added.
Other features of Assign Driver / Get Directions

Sort By Driver to see that specific driver’s deliveries.
Print Receipt – To use this function, first select an order and the select “Print Receipt”. Two receipts will print:
- An itemized customer receipt with payment delivery directions at the bottom
- A driver receipt which includes:
- Driver Name
- Time & Date it was printed
- Check No.
- Customer’s Name, Address, and Phone Number
- Delivery Time
- Amount to collect
Get Directions provides a turn-by-turn print out for each delivery. The directions for the first stop are from the restaurant to the customer but the preceding directions start from the last delivery address to the next. This feature is available with the Google Maps integration.
- Select Get Directions
- Select the driver or employee’s name
- All current orders assigned to the driver/employee appear
- Select the deliveries in the order you wish to have directions printed
- Note: Depending on the order of stops you select it will print the directions starting from your last stop.
- Each selection adds an entry to the “Stops” section
- Select Get Directions when you are done adding stops
- A separate slip prints for each delivery