
In this article:
- Taking a phone order
- Dispatching Drivers
- Closing a delivery order and adding tips
- Changing the time or day of a pickup
- Adding a deposit (or partial payment) for a large order
- Reordering saved items
- Staff Notes vs Special Instructions
Taking a phone order
Caller ID
When using integrated Caller ID, the POS system flashes “Ringing” in the lower corner of the order screen when a call comes in. Touch the message. For repeat customers, the customer’s information auto-populates on the customer information screen. If the caller has not called before, you can go ahead and take the customer’s name and address (if applicable).
Phone Orders can be accessed from multiple places.
- From the order screen, Select Phone Orders followed by New Phone Order; Or, you may have a function button called New Phone Order. This function bypasses the submenu to place a new order or edit an order
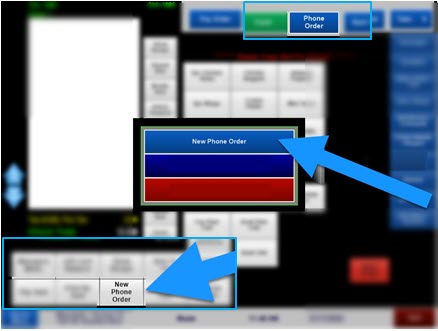
- If your restaurant offers delivery, you will be prompted to choose Pick Up or Delivery. Choose Delivery.
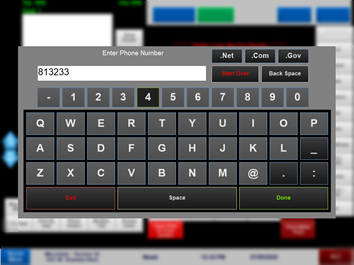
- Enter the customer’s phone number and touch Done
Note
While you can enter the customer’s name instead of the phone number using this keyboard, use the phone number to prevent duplicates and confusion. You can attach a name to the phone number on the following screen.
NO MATCH FOUND
If the customer has not ordered before, you will receive a quick message that says, “No Match Found”. This means the customer is not matched with a saved customer in your system. -
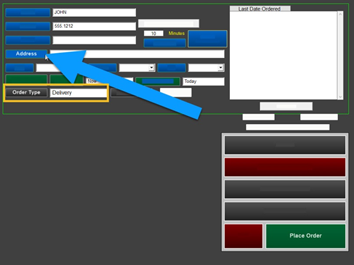
You must enter the customers address when placing a delivery order. Touch Address
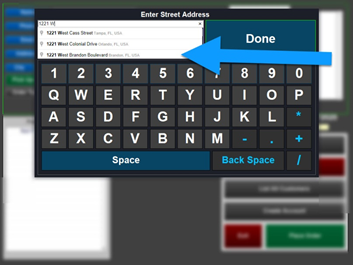
- Begin typing in the address (using integrated mapping, addresses near your location will begin populating).
- Touch the matching address.
Note
This order will be assigned to a driver later, after the order is placed. Please read How to Dispatch a driver after completing this section.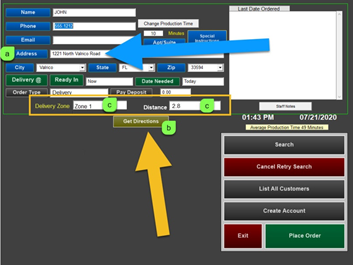
a. After the address is entered,
b. select Get Directions to ensure the address is within your restaurants zoning. You do not have to select “Get Directions” but it is a good way to find out if the address is within your zones before going to the order screen
c. Get directions auto-populates the delivery zone and distance or time. This feature is available using the integration to Google Maps. Available for a minimal annual subscription fee. - Select Place Order to enter in the customer’s order. By default, the order will be placed for immediate production;
For a standard pickup order, the fields on this page are not required!
However, it is a good idea to at least get the person’s name.
- Enter the order
- Select Done when completed
- “Pre Pay Order Now?” prompts onscreen
- Select Yes to prepay a delivery.
- Follow the prompts to enter the customer’s credit card
-
**For contactless delivery, ask the customer to provide the tip over the phone** otherwise, you need to take the credit card slip on the delivery run to have the customer write in the tip.
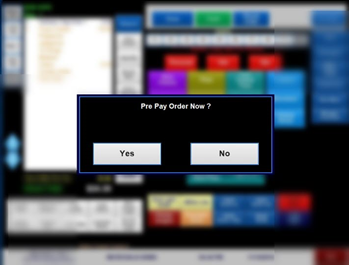
If you accidentally selected "No", you can still enter the customer's credit card number! Please follow this link.
How to dispatch a driver
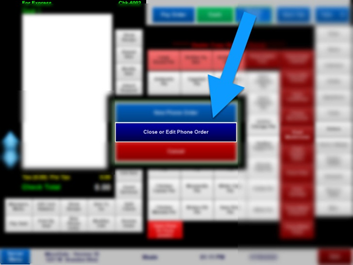
- You can assign a driver for dispatch from multiple places; through the Driver Access button on the ID screen or selecting Phone Order > Close or Edit Phone Order
- Select Assign Driver / Get Directions
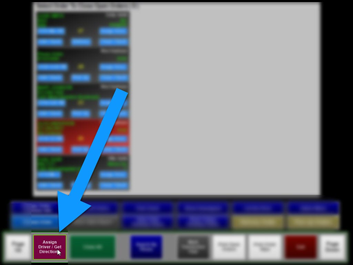
- The screen displays all unassigned orders in a spreadsheet.
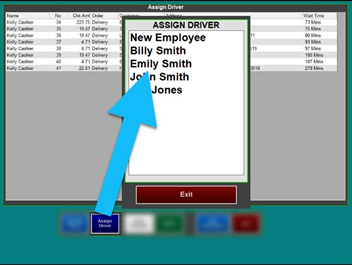
- Touch Assign Driver
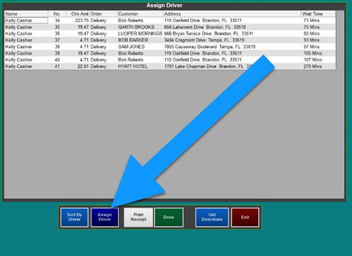
- Select the Driver’s Name
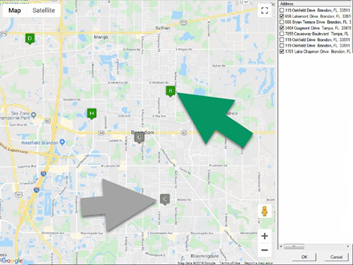
- After selecting the driver’s name, the map displays all the open delivery orders
- Select a gray pin or place a check mark next to the address. The pin will turn green, meaning is assigned to that driver.
- When finished, select OK
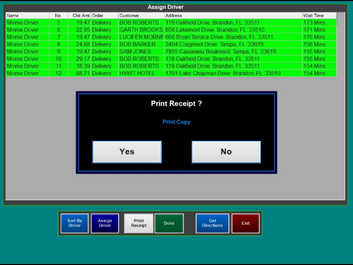
- Once the addresses are selected, choose whether or not to print the customer receipts
-
Keep the credit card slip with the customer receipt to stay organized. Ask the customer to sign the slip and add a tip at the time of delivery, if the tip was not already added.
Closing delivery checks and applying tips
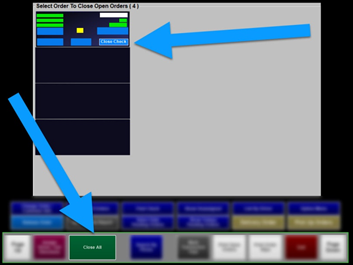
- From the order screen, Select Phone Orders followed by Close or Edit Phone Order
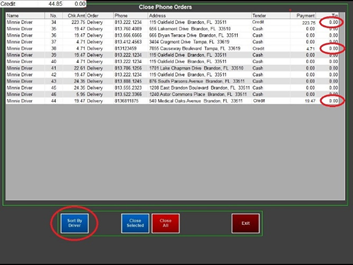
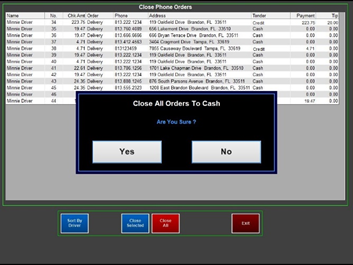
- There are two options available, select Close Check or Close All. Close All screen can be used to apply tips and Close All to Cash or Uber Eats. Etc.
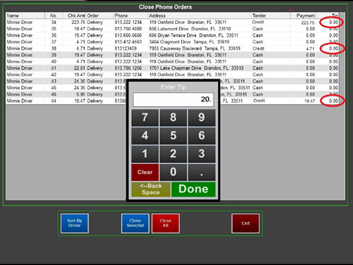
- The Close All screen allows you to Sort By Driver to see that specific driver’s deliveries. Touch the 0.00 under the tip field to apply the credit card tip (cash tips are entered at Punch Out).
- Enter the tip and select Done
- After all tips are entered select either Close Selected or Close All
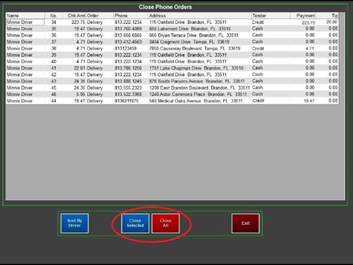
- Select Yes to close all to cash, Uber Eats, Etc.
- Select Yes to print the Amount Closed payment slip.
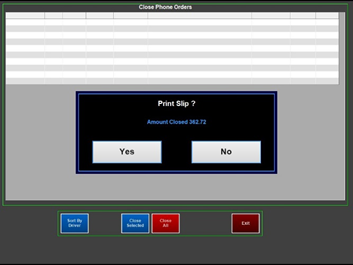
Note Print Slip shows the total amount closed and the employee who closed the orders. Keep this slip with the printed driver report or put the slip in the cash drawer. - Once all orders are closed, the screen displays No Open Orders
More Options
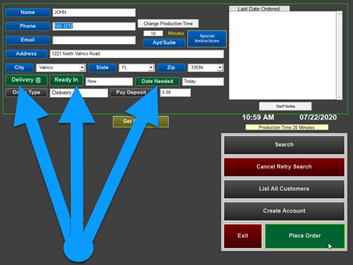
Changing the time or day of pickup (on the phone order screen, before you place the order)
- Touch “Pick Up @ or Delivery @. Enter the specific time when prompted
- Or, touch Ready In __ minutes.
- If this is for a future date, touch Date Needed
Adding a Deposit and Search Criteria
- You will not enter credit card information for prepayments from this screen. You will be prompted at the end of the customer’s order where you can provide the Check Total.
- If you want to have the customer pay a deposit (or portion of the bill) for a large order, you can use Pay Deposit. This option is typically only used for large preorders, where you may want to collect a portion of the check upfront to help cover the cost of items.
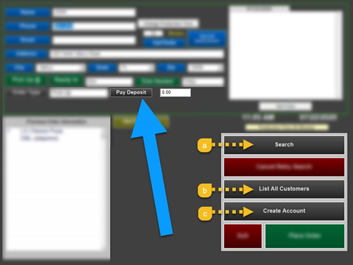
a. Search and
b. List All Customers can be used to locate previous customers by Name, Phone or Address if the customer may want to place an order on a specific account but did not provide the correct phone number originally. c. Create Account is used for House Accounts, where the customer will be billed later on. Please refer to the document on House Accounts if you are interested in using this feature.
You can also add a deposit later, after the order is placed. Please follow this link.
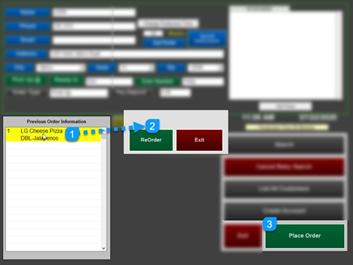
Reordering saved items
If the customer has ordered in the past, their last order appears in the lower corner of the screen.
- To reorder 1 or multiple items, touch the menu item
- Select ReOrder. The menu item(s) will disappear from this screen and be moved to the order screen
- Select Place Order
Staff Notes vs. Special Instructions
Staff Notes do not print and Special Instructions print on the bottom of the receipt.
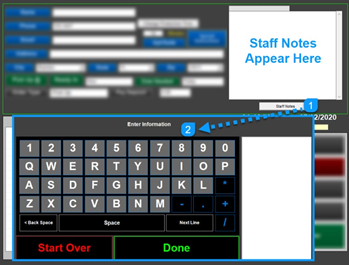
Staff Notes
Staff Notes are useful to share information on this customer prior to placing the order; such as “get prepayment – customer did not pick up last order”, etc.
Staff Notes do not print on the customer’s receipt. The information can only be seen here (on the customer’s profile)
- Select Staff Notes
- Enter the notes and select Done. Staff notes are shown in the top right area of the screen
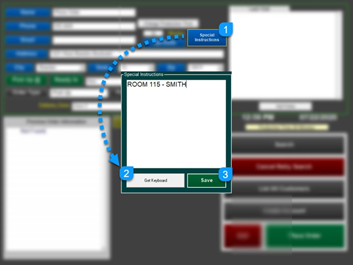
Special Instructions
Special Instructions print on the customer receipt. This area is useful for delivery, to help further describe where the customer is located (apt building in the back, blue building) or (please add extra cutlery in the bag!)
- Select Special Instructions
- Select Get Keyboard
- Save when finished
How to ring in hotel orders (using Special Instructions)
For Hotel orders, use the hotel name, address, and hotel phone number in the standard area. This ensures that when you enter the phone number it always brings up the correct hotel
Do not use the apt/suite number for hotel numbers! The apt/suite area is designed for static addresses. If you change this, it will save a new address.
- Enter in the room number and customer name into the Special Instructions box. This area is easily changed and prints on the bottom of the guest check.
